Vinyl siding is a relatively low-maintenance home exterior product that occasionally gets damaged. Experts at Vinyl Siding Charleston SC addresses these problems quickly to prevent wood rot, insect infestation, and moisture damage.
Start by thoroughly inspecting the area for rot, insect infestation, or loose boards. If necessary, remove the damaged section of vinyl using a pry bar.
Vinyl is more low-maintenance than advertised and can develop cracks that detract from the home’s curb appeal. These cracks can also lead to water damage that can be a source of mold, mildew, or rot inside the home. These issues are best repaired with the help of an experienced and professional contractor.
In addition to the potential health risks, water damage can also lower a home’s resale value. Having a professional inspect the vinyl for signs of water damage can ensure that any needed repairs are done before a potential buyer sees them and decides to pass on your property.
If a row of vinyl siding has cracked or broken, it may be possible to replace individual boards. A special tool called a zip tool can be used to unlock each panel from the one below it and from the house itself. This can be difficult, however, because of the way in which each panel snaps into place and interlocks with the one above it. The best time to work on this task is when it’s warm outside, since vinyl is easier to manipulate in warmer temperatures.
It’s also important to wear protective gloves and safety glasses when working with tools like tin snips, utility knifes, or hammers. These tools can cause injury if not used properly, so it’s crucial to always follow the instructions on each piece of equipment you use. Additionally, it’s recommended that you make sure that any areas you’re repairing are clean, as the caulk or patch will require a smooth surface for proper adhesion.
While vinyl is fairly resilient, it’s still susceptible to damage from stray baseballs or hail, among other sources. Small holes and cracks can be filled with exterior-grade caulk that matches the tint of your vinyl, which can be purchased from most hardware stores and home centers. To do this, first, you’ll need to clean the damaged area thoroughly and let it dry completely.
Next, find a scrap piece of your vinyl siding that’s slightly bigger than the hole or crack. Cut the uppermost perforated edge of the scrap vinyl, which is designed to cover nail holes, being careful not to cut through the curved lip at the bottom of the panel. Apply the caulk to the damaged area, smoothing it with your finger or a putty knife for a clean finish. Finally, paint the repaired area to match the rest of your vinyl siding.
If you have a hole in your vinyl siding, it can expose the wood to water and other elements. This can lead to further damage, like mold and rot. To prevent this, you should have the hole repaired as soon as possible. This can be done by either filling the hole or replacing the damaged panel with a new one.
To repair holes, first clean the area around the damage with warm soapy water to have a smooth surface that caulk can stick to. Next, remove the old panel with a zip tool. Start at one end and gently pry up the vinyl until it comes off the sheathing. Be careful not to bend the panels too much; you only want to remove the vinyl so you can access the nails holding it to the sheathing.
Once you have the old panel removed, cut a piece of new vinyl siding to size with a utility knife. You may have to trim down the curved bottom lip on the patch piece so it fits, and then secure it over the damaged area with construction adhesive.
This method is ideal if you have extra vinyl siding lying around that matches your house, or if you can purchase a patch that will match. If not, you can still use the patching technique to cover a larger hole or crack in the vinyl.
Apply a small bead of caulk to the back of the patch, then place it over the damage and press it in. Next, apply a second bead of caulk to the inside edge of the patch so it seals to the existing vinyl. Once the caulk is dry, you can paint the patch to match your vinyl siding. It may take a few coats to get it perfect, but the end result will be a seamless repair that looks great and will keep moisture and other elements out of your home.
Depending on the severity of the leak, it could cause damage to your home’s interior walls, floors and furniture. Water infiltration can also lead to costly mold growth, wood rot and insect infestation. Fortunately, most vinyl siding leaks are fairly easy to diagnose and fix. A small amount of caulking or putty is generally enough to fix a hole or crack in vinyl siding. Ideally, use caulk that’s specifically formulated for vinyl siding. This will help ensure the caulk stays in place and does not degrade or erode over time.
If the leak is coming from a vinyl window, you can often tell by the presence of mold and mildew around the frame of the window. Mold and mildew can actually deteriorate vinyl siding, leading to sagging and discoloration. Mold can also have negative health effects on those inside the home, causing itchy eyes, coughing and other respiratory issues.
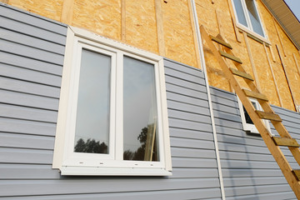
Another common cause of vinyl siding leaks is improper installation of J-channel and flashing. A faulty J-channel can allow rainwater to penetrate behind the vinyl siding and enter the walls of your home, resulting in expensive problems like pest infiltration and rot.
Vinyl siding J-channels are designed to hide the ends of the siding near trim areas such as windows and corner boards. To keep the trim pieces from moving and opening up, a piece of metal called a flashing is installed. This metal flashing is a crucial component of the system because it prevents moisture from penetrating between the wall and the trim.
If the flashing is leaking, it’s important to repair it as soon as possible. In some cases, it may be necessary to remove a piece of vinyl siding to properly inspect the area and to determine the source of the leak. You should always be sure to wear gloves and safety glasses when working with tools like tin snips, utility knives and hammers. If you are not comfortable repairing the leak yourself, a professional contractor will be able to assess the problem and provide a quote for a proper repair.
There are few problems that scream “I need help!” like water damage to vinyl siding. This can lead to mold growth, rot in the sheathing, and even cracks in foundation walls. Unfortunately, water behind vinyl siding isn’t always easy to detect. The best way to catch it is by watching for the telltale signs of moisture. If you see any of these, it’s time to call a pro to take a look and address the issue immediately.
Water stains, discoloration, fungus or algae, and peeling paint are all sure signs that water has reached the sheathing. In extreme cases, the sheathing could deteriorate, putting your entire home’s structural integrity at risk. While it’s tempting to put off these repairs, they can only get worse with time. In some cases, ignoring the problem will cause the wood to rot, which is far more expensive and time-consuming than simply patching vinyl.
If your vinyl siding is displaying these symptoms, it’s time to call a professional siding contractor for help. They’ll be able to examine your siding for underlying issues that need to be addressed and ensure that any damage is caught in a timely manner to avoid extensive and costly repair work.
One of the most common and easily treatable types of water damage in vinyl siding is a small divot or hole less than an inch in size. You can fix these by filling the divot or hole with caulk. To do so, load a caulking gun with waterproof caulk and apply a bead of the material around the edge of the damaged panel. Smooth the caulk with a putty knife, wait for it to dry, and then paint over it in a color that matches your siding.
For larger holes or damaged areas, you can use a vinyl siding patch. This type of patch is available at most hardware stores and is designed to be a seamless replacement for a section of your vinyl siding. To install the patch, remove the existing piece of vinyl with a zip tool or other siding removal tool and place the new patch over the damaged area. Use construction adhesive to secure the patch in place.